LVM Essentials: Getting Started

📌 LVM: A Flexible Storage Solution
LVM (Logical Volume Manager) is a flexible storage management system in Linux that allows you to manage disk storage efficiently by abstracting physical disks into logical volumes.
📌 The Advantages Over Traditional Partitioning
LVM offers several advantages over traditional partitioning:
Flexible resizing of partitions (Logical Volumes).
Easy storage expansion by adding new disks.
Snapshots for backups without downtime.
Better disk space management across multiple physical disks.
📃 Understanding Its Core Components
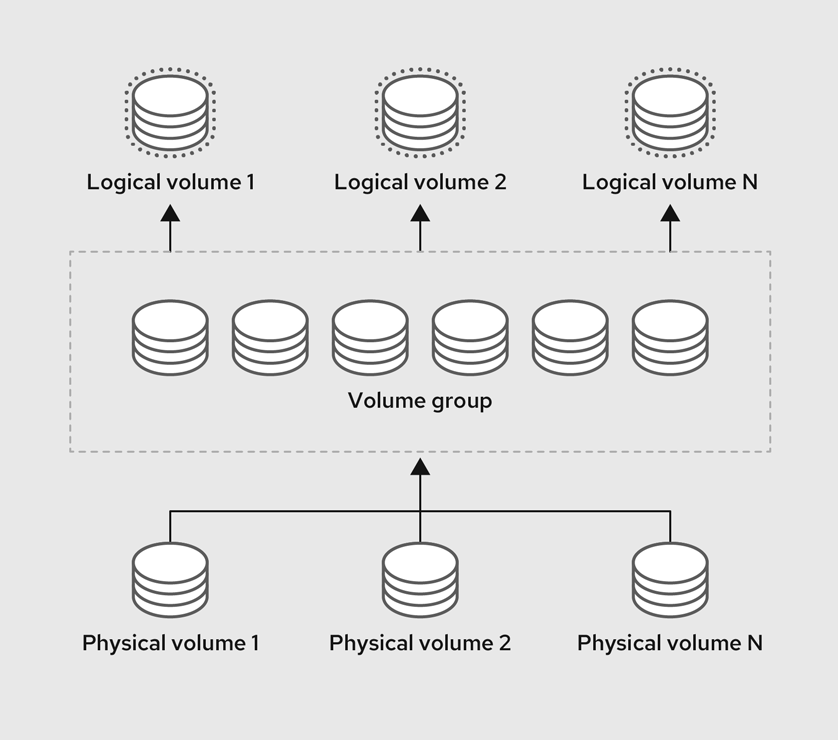
LVM has three main layers:
Physical Volume (PV) → A raw disk that has been initialized to be used with LVM.
Volume Group (VG) → A pool of storage combining multiple PVs. It contains multiple LVs.
Logical Volume (LV) → Virtual partitions created from a VG.
Setting Up LVM on EC2: Step-by-Step Guide
First, we create an EC2 instance. Then, we attach two EBS volumes each of size 2GB to our ec2 instance. If you’re not familiar with EBS volumes, I strongly recommend checking out this blog where we explore EBS volumes in detail.
Step 1️⃣: Identifying Your Storage: Checking Available Disks
Before setting up LVM, list available storage devices using lsblk
ubuntu@ip-172-31-85-225:~$ lsblk
NAME     MAJ:MIN RM  SIZE RO TYPE MOUNTPOINTS
loop0      7:0    0 25.2M  1 loop /snap/amazon-ssm-agent/7993
loop1      7:1    0 55.7M  1 loop /snap/core18/2829
loop2      7:2    0 38.8M  1 loop /snap/snapd/21759
loop3      7:3    0 55.4M  1 loop /snap/core18/2846
loop4      7:4    0 44.4M  1 loop /snap/snapd/23545
xvda     202:0    0    8G  0 disk
├─xvda1  202:1    0    7G  0 part /
├─xvda14 202:14   0    4M  0 part
├─xvda15 202:15   0  106M  0 part /boot/efi
└─xvda16 259:0    0  913M  0 part /boot
xvdf     202:80   0    2G  0 disk
xvdg     202:96   0    2G  0 disk
We have two volumes, namely /dev/xvdf and /dev/xvdg, each of size 2 GB.
Step 2️⃣: Transforming Raw Disks: Creating Physical Volumes
We convert these raw volumes into Physical Volumes (PVs) for LVM:
sudo pvcreate /dev/xvdf
sudo pvcreate /dev/xvdg
To verify, we use
sudo pvdisplay
or,
sudo pvs
Expected output:
ubuntu@ip-172-31-85-225:~$ sudo pvdisplay
  "/dev/xvdf" is a new physical volume of "2.00 GiB"
  --- NEW Physical volume ---
  PV Name               /dev/xvdf
  VG Name
  PV Size               2.00 GiB
  Allocatable           NO
  PE Size               0
  Total PE              0
  Free PE               0
  Allocated PE          0
  PV UUID               eiASol-bvmk-wkw0-SdJb-4RRB-7h9g-cJ0B0M

  "/dev/xvdg" is a new physical volume of "2.00 GiB"
  --- NEW Physical volume ---
  PV Name               /dev/xvdg
  VG Name
  PV Size               2.00 GiB
  Allocatable           NO
  PE Size               0
  Total PE              0
  Free PE               0
  Allocated PE          0
  PV UUID               BvhzOf-2ZzX-v4mi-f3Ew-7uUy-ZGIe-ENpNSb

ubuntu@ip-172-31-85-225:~$ sudo pvs
  PV         VG Fmt  Attr PSize PFree
  /dev/xvdf     lvm2 ---  2.00g 2.00g
  /dev/xvdg     lvm2 ---  2.00g 2.00g
Step 3️⃣: Pooling Resources: Creating a Volume Group
Now, as our physical volumes (i.e./dev/xvdf,/dev/xvdg) are ready for use, we combine both them into a single storage pool i.e. a volume group.
We can have multiple volume groups. Here, our volume group is named as my_demo_vg.
We can create a volume group from a single physical volume too.
sudo vgcreate my_demo_vg /dev/xvdf /dev/xvdg
To verify, we use
sudo vgdisplay
or,
sudo vgs
Expected output:
ubuntu@ip-172-31-85-225:~$ sudo vgdisplay
  --- Volume group ---
  VG Name               my_demo_vg
  System ID
  Format                lvm2
  Metadata Areas        2
  Metadata Sequence No  1
  VG Access             read/write
  VG Status             resizable
  MAX LV                0
  Cur LV                0
  Open LV               0
  Max PV                0
  Cur PV                2
  Act PV                2
  VG Size               3.99 GiB
  PE Size               4.00 MiB
  Total PE              1022
  Alloc PE / Size       0 / 0
  Free  PE / Size       1022 / 3.99 GiB
  VG UUID               RwQojp-N9Gp-N1E7-FCwx-XUl3-bEwL-lqaDtR

ubuntu@ip-172-31-85-225:~$ sudo vgs
  VG         #PV #LV #SN Attr   VSize VFree
  my_demo_vg   2   0   0 wz--n- 3.99g 3.99g
Step 4️⃣: Building Virtual Partitions: Creating Logical Volumes
Now, we create multiple logical volumes from the volume group my_demo_vg. Initially, we would create a logical volume of size 3GB with the name first_lv.
sudo lvcreate my_demo_vg -L 3G -n first_lv
To verify, we use
sudo lvdisplay
or,
sudo lvs
Expected output:
ubuntu@ip-172-31-85-225:~$ sudo lvdisplay
  --- Logical volume ---
  LV Path                /dev/my_demo_vg/first_lv
  LV Name                first_lv
  VG Name                my_demo_vg
  LV UUID                e2oGdc-BnPQ-i5fG-Ld0Q-RDf1-wh8j-X8Luzk
  LV Write Access        read/write
  LV Creation host, time ip-172-31-85-225, 2025-02-08 14:06:42 +0000
  LV Status              available
  # open                 0
  LV Size                3.00 GiB
  Current LE             768
  Segments               2
  Allocation             inherit
  Read ahead sectors     auto
  - currently set to     256
  Block device           252:0

ubuntu@ip-172-31-85-225:~$ sudo lvs
  LV       VG         Attr       LSize Pool Origin Data%  Meta%  Move Log Cpy%Sync Convert
  first_lv my_demo_vg -wi-a----- 3.00g
Step 5️⃣: Preparing for Use: Formatting and Mounting Logical Volumes
We format the logical volume with
ext4filesystem. Otherwise, we can't use them for storing data.Here, we need to use the absolute path of the LV.
sudo mkfs.ext4 /dev/my_demo_vg/first_lvNow, for mounting, we create a directory in
/media:sudo mkdir /media/studyFor mounting the logical volume to
/media/study, usesudo mount /dev/my_demo_vg/first_lv /media/studyTo verify, we use
df -hExpected output:
  ubuntu@ip-172-31-85-225:~$ df -h
  Filesystem                       Size  Used Avail Use% Mounted on
  /dev/root                        6.8G  2.2G  4.6G  33% /
  tmpfs                            479M     0  479M   0% /dev/shm
  tmpfs                            192M  904K  191M   1% /run
  tmpfs                            5.0M     0  5.0M   0% /run/lock
  /dev/xvda16                      881M  133M  687M  17% /boot
  /dev/xvda15                      105M  6.1M   99M   6% /boot/efi
  tmpfs                             96M   12K   96M   1% /run/user/1000
  /dev/mapper/my_demo_vg-first_lv  2.9G   24K  2.8G   1% /media/study   # mounting successful 🎉
Step 6️⃣: Ensuring Consistency: Persistent Mounting of Logical Volumes
Every time we reboot our instance, we need to mount the logical volume manually. To avoid that, we add an entry in /etc/fstab. While booting, the system looks at this file and mounts everything included in it line-by-line.
First, create a backup of
/etc/fstabfor safety.sudo cp /etc/fstab /etc/fstab.bkRun
sudo blkid /dev/my_demo_vg/first_lvto get the UUID for the logical volume. Here, its UUID is98a7c1c4-151c-4240-8ffe-d2a4b7216dca.ubuntu@ip-172-31-85-225:~$ sudo blkid /dev/my_demo_vg/first_lv /dev/my_demo_vg/first_lv: UUID="98a7c1c4-151c-4240-8ffe-d2a4b7216dca" BLOCK_SIZE="4096" TYPE="ext4"Make sure the LV is not mounted, else unmount it using:
sudo umount /dev/my_demo_vg/first_lvRun
sudo vi /etc/fstab, add the lineUUID=98a7c1c4-151c-4240-8ffe-d2a4b7216dca /media/study ext4 defaults 0 2at the end and save the file.UUID=98a7c1c4-151c-4240-8ffe-d2a4b7216dcais the device/LV to be mounted./media/studyis the location of mounting.ext4is the type of filesystem present in the device/LV.defaultsfor applying default behaviors while mounting.0used by the dump command; indicates No automatic backup for the filesystem in the device/LV.2indicates lower priority; The device/LV will be checked during boot by fsck (filesystem check), but only after the root filesystem.
Finally, /etc/fstab will look like:
    LABEL=cloudimg-rootfs   /        ext4   discard,commit=30,errors=remount-ro     0 1
    LABEL=BOOT      /boot   ext4    defaults        0 2
    LABEL=UEFI      /boot/efi       vfat    umask=0077      0 1
    UUID=98a7c1c4-151c-4240-8ffe-d2a4b7216dca /media/study ext4 defaults 0 2
Run
sudo mount -a: This will mount everything in/etc/fstabthat are not mounted. In case of any misconfiguration, this will show error.Run
df -hto check if it is mounted properly.
Scaling Up: Expanding Storage with LVM 🚀
One of LVM's main advantages is easily resizing volumes. Suppose, we need some extra storage for the logical volume we just created.
Our EC2 instance has two physical volumes each of size 2GB attached with it. So, the total size of the volume group will be 4GB. However, we have created a LV of size 3GB. 1GB of space is still free in the volume group my_demo_vg.
ubuntu@ip-172-31-85-225:~$ sudo vgdisplay
  --- Volume group ---
  VG Name               my_demo_vg
  System ID
  Format                lvm2
  Metadata Areas        2
  Metadata Sequence No  2
  VG Access             read/write
  VG Status             resizable
  MAX LV                0
  Cur LV                1
  Open LV               1
  Max PV                0
  Cur PV                2
  Act PV                2
  VG Size               3.99 GiB
  PE Size               4.00 MiB
  Total PE              1022
  Alloc PE / Size       768 / 3.00 GiB
  Free  PE / Size       254 / 1016.00 MiB       # unallocated free memory
  VG UUID               RwQojp-N9Gp-N1E7-FCwx-XUl3-bEwL-lqaDtR
Since, first_lv originates from my_demo_vg, we can expand the LV to take up the remaining space using:
sudo lvextend -l +100%FREE /dev/my_demo_vg/first_lv # -l +100%FREE extends the LV to take up the entire remaining space in the VG
Additionally, we need to resize the filesystem so that it can utilize the extra space:
sudo resize2fs /dev/my_demo_vg/first_lv
To verify, use df -h:
ubuntu@ip-172-31-85-225:~$ df -h
Filesystem                       Size  Used Avail Use% Mounted on
/dev/root                        6.8G  2.2G  4.6G  33% /
tmpfs                            479M     0  479M   0% /dev/shm
tmpfs                            192M  896K  191M   1% /run
tmpfs                            5.0M     0  5.0M   0% /run/lock
/dev/xvda16                      881M  133M  687M  17% /boot
/dev/xvda15                      105M  6.1M   99M   6% /boot/efi
tmpfs                             96M   12K   96M   1% /run/user/1000
/dev/mapper/my_demo_vg-first_lv  3.9G   24K  3.7G   1% /media/study     # size increased successfully 🥳
Beyond Limits: Further Expanding Logical Volumes 🔥
The total size of the volume group my_demo_vg is 4GB. It is totally occupied by the logical volume first_lv. To further expand it, we need some free, unclaimed space in the volume group my_demo_vg.
First, attach another volume (say,
/dev/xvdh) of 3GB to our ec2.Convert the newly attached volume into PV, use
sudo pvcreate /dev/xvdhVerify using
sudo pvs.ubuntu@ip-172-31-85-225:~$ sudo pvs PV VG Fmt Attr PSize PFree /dev/xvdf my_demo_vg lvm2 a-- <2.00g 0 /dev/xvdg my_demo_vg lvm2 a-- <2.00g 0 /dev/xvdh lvm2 --- 3.00g 3.00g # new physical volumeNow, we include this additional space to the existing volume group my_demo_vg.
sudo vgextend my_demo_vg /dev/xvdhVerify using
sudo vgs.VG #PV #LV #SN Attr VSize VFree my_demo_vg 3 1 0 wz--n- <6.99g <3.00gNow, as our volume group my_demo_vg has 3GB of extra space, we can use it to expand the LV.
Here, we add another 2GB to our logical volume first_lv. We can use the
--resizefsflag to resize the filesystem during expansion.sudo lvextend --resizefs -L +2G /dev/my_demo_vg/first_lvVerify using
sudo lvsLV VG Attr LSize Pool Origin Data% Meta% Move Log Cpy%Sync Convert first_lv my_demo_vg -wi-ao---- 5.99g
Adding another Volume Group 🎯
First, attach another volume (say,
/dev/xvdi) of 4GB to our ec2.Convert the newly attached volume into PV.
Create a new volume group, named as extra_vg.
Verify using
sudo vgs.VG #PV #LV #SN Attr VSize VFree extra_vg 1 0 0 wz--n- <4.00g <4.00g # newly created volume group my_demo_vg 3 1 0 wz--n- <6.99g 1020.00m
Now, this volume group extra_vg can be used to create LVs.
📍 Cleaning Up: Removing or Deleting LVM Components
Before proceeding, make sure the LV is not mounted.
sudo umount /dev/my_demo_vg/first_lv
Also, delete any corresponding entry from /etc/fstab.
🔹 Deactivate the LV using:
sudo lvchange -an /dev/my_demo_vg/first_lv # -n flag to deactivate; -y flag to reactivate
🔹 remove it using,
sudo lvremove /dev/my_demo_vg/first_lv
When prompted, press y to confirm the removal.
Dismantling Storage Pools: Removing a Volume Group
Make sure the volume group does not contain any LV. Deactivate the volume group first:
sudo vgchange -an my_demo_vg
remove it using,
sudo vgremove my_demo_vg
Reclaiming Space: Deleting a Physical Volume
Make sure the physical volume is not a part of any VG. We can remove it with,
sudo pvremove /dev/xvdf
Finally, we can detach the EBS volumes from our ec2.
📚 Further Reading: Dive Deeper into LVM
For detailed explanation and step-by-step guide on LVM, check out this LearnLinuxTv Tutorial on YouTube.